前言
在wg业务的应用中,又发现了一系列的问题。在现网用着用着就断了,客户投诉了好几次,不得已开始找各种解决办法,后来就找到了udp2raw,git地址:https://github.com/wangyu-/udp2raw.git,基于udp2raw进行了改进以及落地。
wg中应用
WireGuard 尽管是一个更先进、更现代的 VPN 协议,但是它在国内网络环境下会遇到一个致命的问题:UDP 封锁/限速。虽然通过 WireGuard 可以在隧道内传输任何基于 IP 的协议(TCP、UDP、ICMP、SCTP、IPIP、GRE 等),但 WireGuard 隧道本身是通过 UDP 协议进行通信的,而国内运营商根本没有能力和精力根据 TCP 和 UDP 的不同去深度定制不同的 QoS 策略,几乎全部采取一刀切的手段:对 UDP 进行限速甚至封锁。
鲁迅先生说过:羊毛出在羊身上!突破口还是在运营商身上:虽然对 UDP 不友好,但却无力深度检测 TCP 连接的真实性。
这就好办了,既然你对 TCP 连接睁一只眼闭一只眼,那我将 UDP 连接伪装成 TCP 连接不就蒙混过关了。目前支持将 UDP 流量伪装成 TCP 流量的主流工具是 udp2raw。
伪装命令:
# udp2raw --help
udp2raw-tunnel
git version:    build date:Jul 28 2023 09:50:52
repository: https://github.com/wangyu-/udp2raw-tunnel

usage:
    run as client : ./this_program -c -l local_listen_ip:local_port -r server_host:server_port  [options]
    run as server : ./this_program -s -l server_listen_ip:server_port -r remote_host:remote_port  [options]

common options,these options must be same on both side:
    --raw-mode            <string>        avaliable values:faketcp(default),udp,icmp
    -k,--key              <string>        password to gen symetric key,default:"secret key"
    --cipher-mode         <string>        avaliable values:aes128cbc(default),xor,none
    --auth-mode           <string>        avaliable values:md5(default),crc32,simple,none
    -a,--auto-rule                        auto add (and delete) iptables rule
    -g,--gen-rule                         generate iptables rule then exit,so that you can copy and
                                          add it manually.overrides -a
    --disable-anti-replay                 disable anti-replay,not suggested
client options:
    --source-ip           <ip>            force source-ip for raw socket
    --source-port         <port>          force source-port for raw socket,tcp/udp only
                                          this option disables port changing while re-connecting
other options:
    --conf-file           <string>        read options from a configuration file instead of command line.
                                          check example.conf in repo for format
    --fifo                <string>        use a fifo(named pipe) for sending commands to the running program,
                                          check readme.md in repository for supported commands.
    --log-level           <number>        0:never    1:fatal   2:error   3:warn
                                          4:info (default)     5:debug   6:trace
    --log-position                        enable file name,function name,line number in log
    --disable-color                       disable log color
    --disable-bpf                         disable the kernel space filter,most time its not necessary
                                          unless you suspect there is a bug
    --sock-buf            <number>        buf size for socket,>=10 and <=10240,unit:kbyte,default:1024
    --force-sock-buf                      bypass system limitation while setting sock-buf
    --seq-mode            <number>        seq increase mode for faketcp:
                                          0:static header,do not increase seq and ack_seq
                                          1:increase seq for every packet,simply ack last seq
                                          2:increase seq randomly, about every 3 packets,simply ack last seq
                                          3:simulate an almost real seq/ack procedure(default)
                                          4:similiar to 3,but do not consider TCP Option Window_Scale,
                                          maybe useful when firewall doesnt support TCP Option
    --lower-level         <string>        send packets at OSI level 2, format:'if_name#dest_mac_adress'
                                          ie:'eth0#00:23:45:67:89:b9'.or try '--lower-level auto' to obtain
                                          the parameter automatically,specify it manually if 'auto' failed
    --wait-lock                           wait for xtables lock while invoking iptables, need iptables v1.4.20+
    --gen-add                             generate iptables rule and add it permanently,then exit.overrides -g
    --keep-rule                           monitor iptables and auto re-add if necessary.implys -a
    --hb-len              <number>        length of heart-beat packet, >=0 and <=1500
    --mtu-warn            <number>        mtu warning threshold, unit:byte, default:1375
    --clear                               clear any iptables rules added by this program.overrides everything
    --retry-on-error                      retry on error, allow to start udp2raw before network is initialized
    -h,--help                             print this help message
配置
客户端wg配置
# cat wg_10004
[Interface]
PrivateKey=2No7YStLNZN6QF4HHkb+5LZpSZt5Ih7aDF+CVMMhsUc=
[Peer]
PublicKey=vHZv3rf4GZsALwEoOml/JugdrI4GRPE5mv3xsWDYbCQ=
PresharedKey=Yh8rHLu5OqBGOqI0j4k/Z/X3VVUxfeYu9FRJ/wMV9B8=
AllowedIPs=0.0.0.0/0
Endpoint=127.0.0.1:51820
PersistentKeepalive=25
客户端udp2raw进程:
/usr/bin/udp2raw -c -l 127.0.0.1:51820 -r 192.168.21.219:51820 --raw-mode faketcp --cipher-mode xor --log-level 0 -a --wait-lock
注意:客户端wg配置的 endpoint 已经变成了127.0.0.1, 服务端的wg配置不变。
服务端udp2raw进程:
/usr/bin/udp2raw -s -l 0.0.0.0:51820 -r 127.0.0.1:51820 --raw-mode faketcp --cipher-mode xor
原理
无伪装:
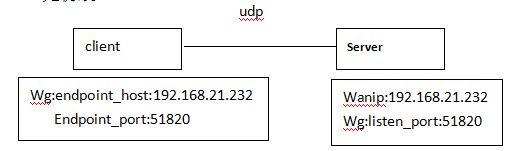
原:wg隧道 server端 wg接口监听udp port 51820,client的wg接口发送数据到server的51820端口。
伪装:
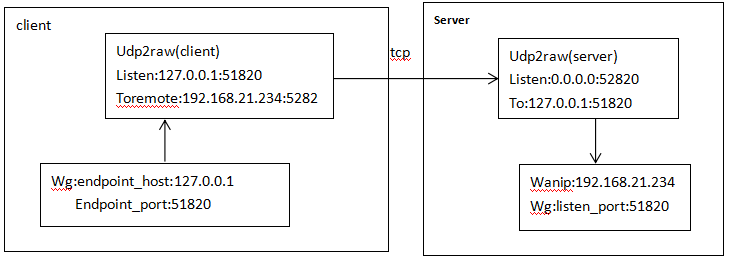
- Client:将wg的endpoint_host 改为127.0.0.1,udp2raw进程监听wg目的地址为127.0.0.1:52820的报文,然后将报文发送到192.168.21.26:52820。
- Server:udp2raw进程监听 0.0.0.0:52820的报文,当收到client发来的报文,转到127.0.0.1:51820接口,wg接口接收报文。
遇到的问题
服务端的链接不能正常自己关闭
现象是当客户端重新换一个端口号进行连接时,在服务端旧的连接不会消失,一直存在,当连接超过设备中最大的tcp连接数时,将不能有新的连接建立。例如,当服务端监听的端口号是61821时的现象:
netstat -an  | grep 61821
tcp      129      0 0.0.0.0:61821           0.0.0.0:*               LISTEN
tcp        1      0 111.207.49.219:61821    111.207.49.213:51484    CLOSE_WAIT
tcp        1      0 111.207.49.219:61821    111.207.49.213:51596    CLOSE_WAIT
tcp        1      0 111.207.49.219:61821    111.207.49.213:51491    CLOSE_WAIT
tcp        1      0 111.207.49.219:61821    111.207.49.213:51477    CLOSE_WAIT
tcp        1      0 111.207.49.219:61821    111.207.49.213:51399    CLOSE_WAIT
tcp        1      0 111.207.49.219:61821    111.207.49.213:51599    CLOSE_WAIT
tcp        1      0 111.207.49.219:61821    111.207.49.213:51600    CLOSE_WAIT
tcp        1      0 111.207.49.219:61821    111.207.49.213:51535    CLOSE_WAIT
tcp        1      0 111.207.49.219:61821    111.207.49.213:51589    CLOSE_WAIT
tcp        1      0 111.207.49.219:61821    111.207.49.213:51551    CLOSE_WAIT
tcp        1      0 111.207.49.219:61821    111.207.49.213:51401    CLOSE_WAIT
tcp        1      0 111.207.49.219:61821    111.207.49.213:51510    CLOSE_WAIT
tcp        1      0 111.207.49.219:61821    111.207.49.213:51498    CLOSE_WAIT
tcp        1      0 111.207.49.219:61821    111.207.49.213:51594    CLOSE_WAIT
tcp        1      0 111.207.49.219:61821    111.207.49.213:51402    CLOSE_WAIT
tcp        1      0 111.207.49.219:61821    111.207.49.213:51534    CLOSE_WAIT
tcp        1      0 111.207.49.219:61821    111.207.49.213:51464    CLOSE_WAIT
tcp        1      0 111.207.49.219:61821    111.207.49.213:51490    CLOSE_WAIT
tcp        1      0 111.207.49.219:61821    111.207.49.213:51606    CLOSE_WAIT
tcp        1      0 111.207.49.219:61821    111.207.49.213:51389    CLOSE_WAIT
tcp        1      0 111.207.49.219:61821    111.207.49.213:51403    CLOSE_WAIT
tcp        1      0 111.207.49.219:61821    111.207.49.213:51514    CLOSE_WAIT
tcp        1      0 111.207.49.219:61821    111.207.49.213:51505    CLOSE_WAIT
tcp        1      0 111.207.49.219:61821    111.207.49.213:51461    CLOSE_WAIT
tcp        1      0 111.207.49.219:61821    111.207.49.213:51433    CLOSE_WAIT
tcp        1      0 111.207.49.219:61821    111.207.49.213:51486    CLOSE_WAIT
tcp        1      0 111.207.49.219:61821    111.207.49.213:51449    CLOSE_WAIT
tcp        1      0 111.207.49.219:61821    111.207.49.213:51528    CLOSE_WAIT
tcp        1      0 111.207.49.219:61821    111.207.49.213:51506    CLOSE_WAIT
tcp        1      0 111.207.49.219:61821    111.207.49.213:51450    CLOSE_WAIT
tcp        1      0 111.207.49.219:61821    111.207.49.213:51504    CLOSE_WAIT
tcp        1      0 111.207.49.219:61821    111.207.49.213:51529    CLOSE_WAIT
tcp        1      0 111.207.49.219:61821    111.207.49.213:51422    CLOSE_WAIT
tcp        1      0 111.207.49.219:61821    111.207.49.213:51393    CLOSE_WAIT
tcp        1      0 111.207.49.219:61821    111.207.49.213:51492    CLOSE_WAIT
tcp        1      0 111.207.49.219:61821    111.207.49.213:51445    CLOSE_WAIT
tcp        1      0 111.207.49.219:61821    111.207.49.213:51603    CLOSE_WAIT
tcp        1      0 111.207.49.219:61821    111.207.49.213:51434    CLOSE_WAIT
tcp        1      0 111.207.49.219:61821    111.207.49.213:51446    CLOSE_WAIT
tcp       45      0 111.207.49.219:61821    111.207.49.213:35297    ESTABLISHED
tcp        1      0 111.207.49.219:61821    111.207.49.213:51481    CLOSE_WAIT
tcp        1      0 111.207.49.219:61821    111.207.49.213:51474    CLOSE_WAIT
tcp        1      0 111.207.49.219:61821    111.207.49.213:51468    CLOSE_WAIT
tcp        1      0 111.207.49.219:61821    111.207.49.213:51500    CLOSE_WAIT
...
tcp        1      0 111.207.49.219:61821    111.207.49.213:51424    CLOSE_WAIT
tcp       45      0 111.207.49.219:61821    223.104.38.134:41201    ESTABLISHED
再看一下tcp连接建立与断开的过程图:
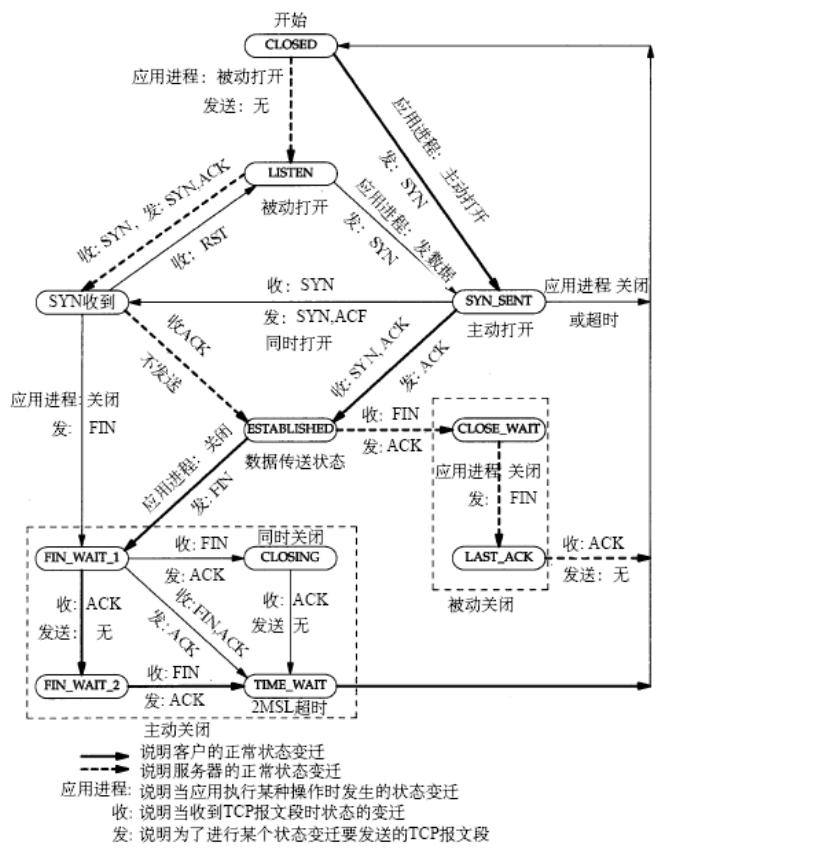
CLOSE_WAIT是TCP的一个状态,它在ESTABLISHED(连接建立)基础上,收到对方的FIN且我方已回ACK,进入CLOSE_WAIT状态。但是如果服务端不执行close(),就不能由CLOSE_WAIT迁移至LAST_ACK。说白了就是对方已关闭我方尚未关闭。
如果有长时间和大量的TCP处于CLOSE_WAIT状态时,原因是连接未正确关闭。
解决如下:
#define NUM_TCP_KEEPCNT 5      //关闭一个非活跃连接之前的最大尝试次数
#define NUM_TCP_KEEPIDLE 10    //关闭一个非活跃连接之前的最大重试次数
#define NUM_TCP_KEEPINTVL 120   //前后两次探测之间的时间间隔,单位是秒

int set_keepalive(int fd){
    int num;
    int r;
    int optval;
    socklen_t optlen = sizeof(optval);

    /* set up SO_KEEPALIVE */
    optval = 1;
    if(setsockopt(fd, SOL_SOCKET, SO_KEEPALIVE, &optval, optlen) < 0){
        mylog(log_fatal,"setsockopt SO_KEEPALIVE fail\n");
        return -1;
    }


    /* set up TCP_KEEPCNT */
    num = NUM_TCP_KEEPCNT;
    if(setsockopt(fd, SOL_TCP, TCP_KEEPCNT, (char*)&num, sizeof(num)) < 0){
        mylog(log_fatal,"setsockopt TCP_KEEPCNT fail\n");
    }


    /* set up TCP_KEEPIDLE */
    num = NUM_TCP_KEEPIDLE;
    if(setsockopt(fd, SOL_TCP, TCP_KEEPIDLE, (char*)&num, sizeof(num)) < 0){
        mylog(log_fatal,"setsockopt TCP_KEEPCNT fail\n");
    }
 /* set up TCP_KEEPINTVL */
    num = NUM_TCP_KEEPINTVL;
    if(setsockopt(fd, SOL_TCP, TCP_KEEPINTVL, (char*)&num, sizeof(num)) < 0){
        mylog(log_fatal,"setsockopt TCP_KEEPINTVL fail\n");
    }

    return 1;
}
或者可以通过修改内核参数解决。keepalibe部分选项如下(一下只是示例,根据实际情况修改):
sysctl -a | grep keepalive
net.ipv4.tcp_keepalive_intvl = 5
net.ipv4.tcp_keepalive_probes = 9
net.ipv4.tcp_keepalive_time = 20
服务端允许连接的数量较少
该问题是上个问题出现时发现的,当连接130个之后,新的连接再也不能建立,内核选项如下:
net.core.somaxconn = 1024– 该内核参数控制传入连接的数量。增加它可以1024让 Momentum 处理更多开放的连接。
还有其他的优化项:
net.ipv4.tcp_tw_reuse– 当从协议角度来看安全时,将处于 TIME_WAIT 状态的套接字重新用于新连接。设置此选项可以1重用打开的连接,从而提高效率。
net.ipv4.tcp_tw_recycle– 此内核参数可实现 TIME_WAIT 套接字的快速回收。设置1允许重用套接字而无需正常等待时间。
net.core.somaxconn介绍
对于一个TCP链接,Server与Client需要通过三次握手来建立网络链接,当三次握手成功之后,我们就可以看到端口状态由LISTEN转为ESTABLISHED,接着这条链路上就可以开始传送数据了。
net.core.somaxconn是Linux中的一个内核(kernel)参数,表示socket监听(listen)的backlog上限。
什么是backlog?backlog就是socket的监听队列,当一个请求(request)尚未被处理或者建立时,它就会进入backlog。
而socket server可以一次性处理backlog中的所有请求,处理后的请求不再位于监听队列中。
当Server处理请求较慢时,导致监听队列被填满后,新来的请求就会被拒绝。